

Sales Order Processing
The SOP module prepares the orders that will go on to create an invoice, Proforma or credit note documents, to send to customers, by paper copy or email.
Sales Orders Processing (SOP) module presents various functionalities to enable you to raise sales documents and to deal with customer queries, stock management, refunds, dues and mail order payments in a multi-currency and multi-location environment.
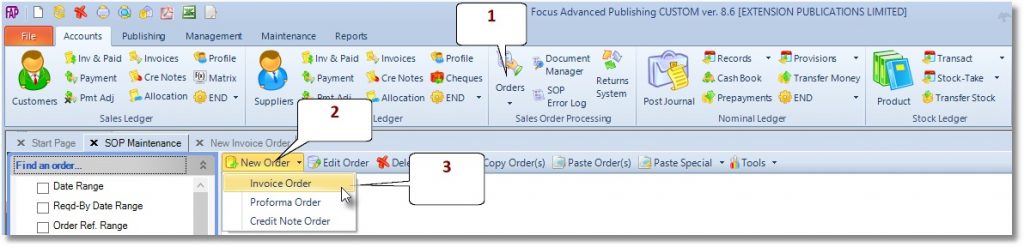
Create a New Order (Invoice, Proforma or Credit Note)
- Go to Accounts > Sales Order Processing > Orders
- Click on the “New Order” button
- Select the required option (Invoice, Proforma or Credit Note) from the drop-down menu.
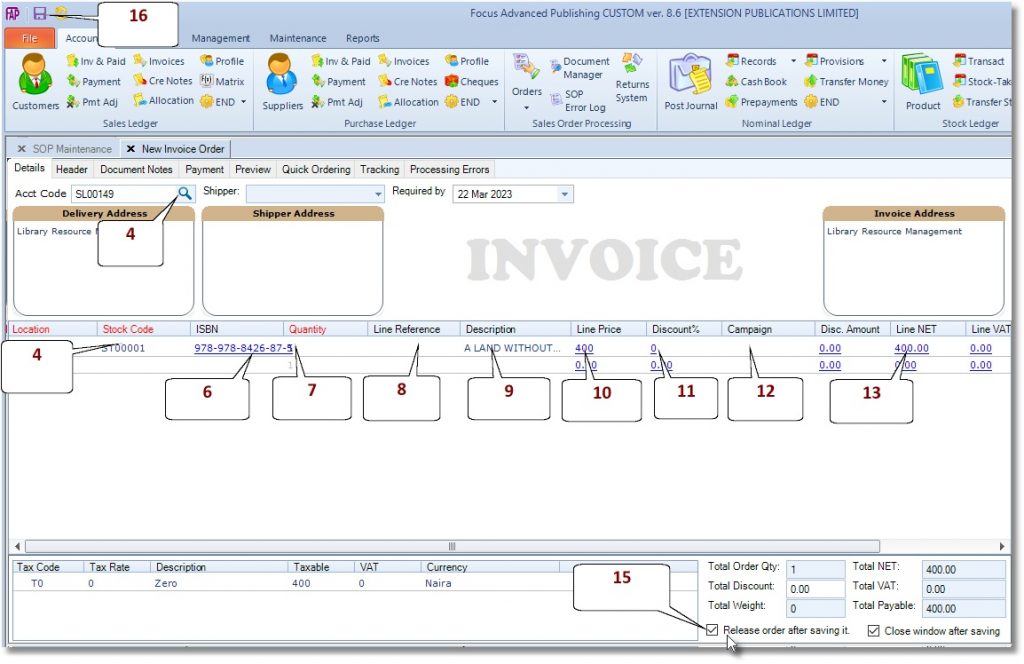
- Search for a Customer code
- Search for a Title to Sell
- The system auto-enters the ISBN
- Enter the required quantity.[1]
- Enter the purchase order number, or a reference you want to tag the order line by.
- The system auto-enters the title here.[2]
- The system auto enters the price, based on the customer’s currency. 2
- The system auto enters the stored discount based on the customer’s default discount or matrix.[3]
- Select an active Campaign if applicable.[4]
- The system auto-maintains the Disc Amount, Line Net, Line VAT, Line Payable
- Please repeat steps 5 – 12, until all the titles have been entered.
- Next, click the “Release order after saving” option to print the invoice after saving.[5]
- Click the Save button to finish.
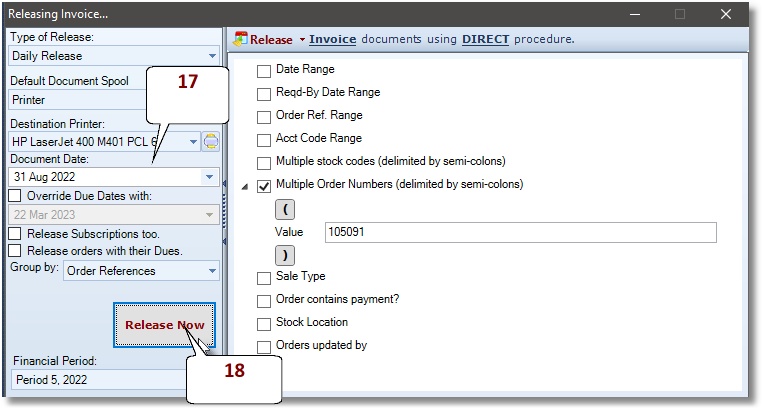
- Next, on the “Release Invoice” settings dialog select print, date options.
- Finally, click on the “Release Now”, to post to the Sales Ledger and to print the invoice document.
Edit an Existing Active Order
- Go to Accounts > Sales Order Processing > Orders
- Find required order by using the “Find an Order…” search options located at the top-left of the window.
- Double-click on the order line in the result panel to the right of the window.
- Edit order.
- Click the SAVE button.
Edit an Existing Done Invoice Order
Once an invoice has been released, and the status has changed from Active to Done, it cannot be edited in any way. The following procedure reverses the effect of the invoice,- Go to Accounts > Sales Order Processing > Orders
- Find required order by using the “Find an Order…” search options located at the top-left of the window.
- Click to select the invoice order
- Click the Copy Order(s) button
- Click the Paste Special > For Same account > Paste as Credit Note to create a new credit note from the details of the selected invoice order.
- Click to select the created credit note order
- Under the Release Selected Orders panel, click Credit Notes to release the selected credit note
Batch Releasing of Invoices, Credit Notes or Proforma
- Go to Accounts > Sales Order Processing > Orders
- Under “Release Selected Orders” in the “SOP Maintenance” window, click on the required option, as shown below.
- Select Type of Release > Daily Release
- Use the Order Selection Criteria to define which orders to release
- Click the Release Now button.
Reprint an Invoice / Document Range
- Go to Accounts > Sales Order Processing > Document Manager
- Find required order by using the “Find a sales document…” search options located at the top-left of the window.
- Click the Refresh button to display documents which meet your selection criteria
- Click to select a document
- Click Send Documents to > Printer

Releasable Orders
Any of the following conditions will prevent the release of an order subject to user rights to override them;
- Required By Date
- Insufficient stock (TOS)
- Title not yet published
- Stock on stop
- Account suspended
- Credit limit restrictions
Required By Date
It is auto-filled with today’s date. The order is released if the Required By date is today’s date or in the past. A Required By date in the future prevents the order from being released.
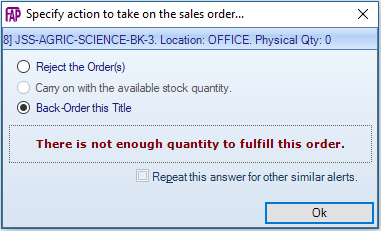
Insufficient stock (TOS)
In such case you will get a message similar to the one below. At this point the user is prompted by the system to choose a course of action:
- Reject
- Carry on with available quantity
- Backorder
If the user chooses to reject the order, an acknowledgement note is printed.
On the other hand, if you choose to back-order, the system records a due against the customer and stock title. The invoice becomes releasable only when the restraining conditions are resolved.
In the SOP window, you are able to release invoices, credit notes, proformas, picking notes and delivery note in one of three ways
Data Transfer Files (DTF)
The DTF file has been designed to carry sales transactions, which were routinely processed at a remote site office or Depot, in a specialized XML format, thereby enabling their batched, one-way transfer to the central database at the Head Office.
To export a DTF file do the following
- Go to Maintenance > Data Manager > Import/Export Data Files
- Select File > New > Data Export
- Under New export select DTF Files (Data Transfer File) and click Next
- Click Next again, to display the transfer settings
- Tick the ‘Run this routine after saving’ box
- Click Finish
- The DTF file is created with a sequential numbering and saved to the default export folder.
- Attach the DTF file to an email and send to the authorised personnel at Head Office, who should subsequently, save (un-zip) it to the default folder. The DTF file is an XML file format and will almost always be small enough to be transmitted by email. However, if the size of the DTF file is large for email, you may need to zip the file to reduce its size.
Inspection/Sample/Gratis copies
How to handle the sample copies orders
- Go to Accounts > Sales Order Processing > Orders
- Click on the “New Order” button
- Select the Invoice option from the drop-down menu.
- Search for a Customer code
- Click the Header tab
- In the Type of Sale box select INSPECTION from the dropdown list
- Click the Details tab to continue with creating the order.
[1] If the quantity is available, the system will reserve the quantity, otherwise you will be prompted to Reject, Carry on with available stock quantity or Back-order. If you choose to reject the order line, the system will issue an acknowledgement, on saving the order. Note, the system does not record a rejected order line.
[2] If you need to amend this, click on any of the underlined entries, to edit the Order Line Property, in the right-hand panel.
[3] Please refer to the Frequently Asked Question (FAQ guide, to view the 6 level of discounts applicable.
[4] Selecting an active campaign, may change the price or discount applicable.
[5]Orders may be printed as a batch at a later time or day; in that case, the “Release order after saving” option should NOT be ticked.