

ONIX 3.0
The ONIX for Books Product Information Message is the international standard for representing and communicating book industry product information in electronic form.
The goal of ONIX is to standardize the transmission of product information so that wholesalers, retailers and others in the supply chain will all be able to accept information electronically transferred in ONIX International format.
For more on ONIX visit www.editeur.org and www.bic.org.uk.
Basic data elements ensure that the title record meets the requirements for ONIX validation. Only titles which meet ONIX validation get included in the output ONIX message file. All the Basic Data Elements can be updated on the general product window. The complete set of ONIX data elements are however accessible for update on the ONIX Records page.
Settings
Before attempting to create the ONIX message file, you have to do the following
Load the latest ONIX Code Lists
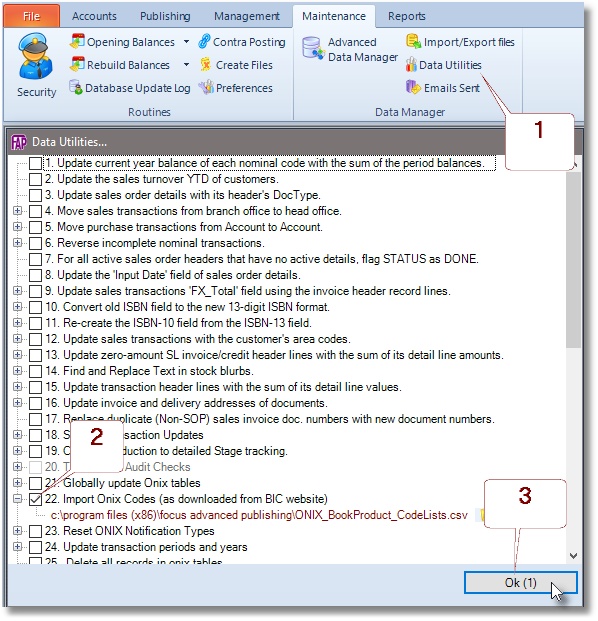
Focus Advanced Publishing software ships the latest ONIX code lists as published by BIC / EDItEUR. To load the complete set of ONIX code lists do the following
- Select Maintenance> Data Manager > Data Utilities
- Tick number 22 ‘Import Onix Codes (as downloaded from BIC website)
- Click OK
EDItEUR, the trade standards body for the global book and serials supply chains, in association with BIC, maintain the standard set of Code Lists which underpin all ONIX for Books and ONIX for Serials message formats.
Register ONIX Recipients
ONIX recipient profile can only be created from an existing customer record. To setup an ONIX recipient profile, first ensure they have a customer record, and then do the following
- Select Publishing> Production > ONIX 3.0
- Under ONIX Sections> ONIX Recipients click the Lookup button to select a customer record. The customer record selected is promptly added to the recipients register
- Enter the following recipient’s specifications
- XML Encoding Attribute: e.g. ISO 8859-1
- Output folder: To avoid access issues resulting from network hopping, the output folder should be on same server as FAPS
- File naming convention
- File creation mode: TEST/LIVE
- Transmission method
- Email message body
- FTP details
- Addressee Identifier composite
- XPath Rules & Constraints
- Allowed Characters: e.g. for character encoding ISO 8859-1, the character ranges are 32 to 127, and 160 to 255
- Click Save
The Addressee data elements are taken from the settings you make per recipient. You can setup multiple recipients and the system will independently create distinct ONIX feed per recipient, with their specified data elements, to meet their transmission requirements.
Select default ONIX recipient
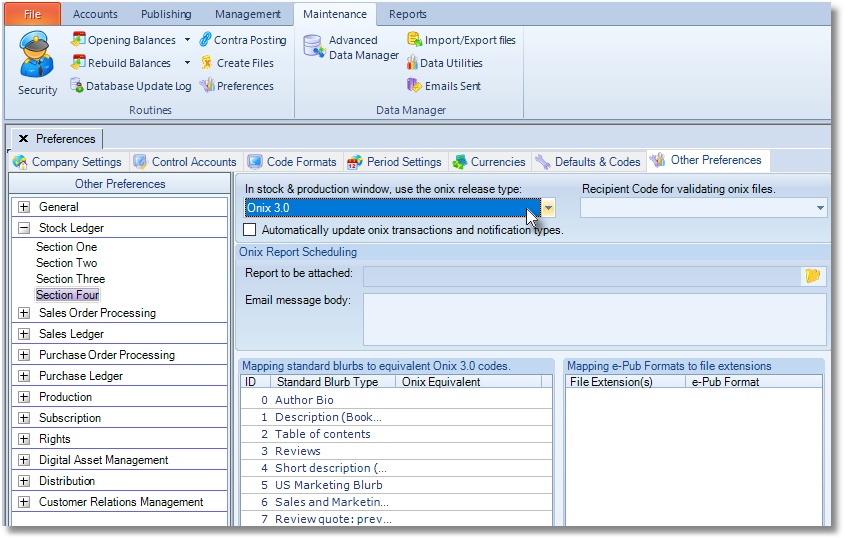
Select one of the registered ONIX 3 recipients as the Default. The profile of the default ONIX recipient is used to test the validity of each product record during the global update run.- Select Maintenance> Preferences > Other Preferences
- Expand Stock Ledger> Section Four
- In the “Recipient Code for validating ONIX files” box select a recipient
- Click the Save Button
Set Stock Status Codes
The profile of the default ONIX recipient is used to test the validity of each product record during the global update run.
- Select Maintenance> Preferences > Other Preferences
- Expand Stock Ledger> Section One
- In the “Stock Satus Values” box match the stock status codes
- Click the Save button
Setup internet email
Email account for sending email notification using SMTP (Simple Mail Transfer Protocol)
- Select Maintenance> Preferences > Other Preferences
- Expand General> Section One
- Under Internet E-mail Settings enter the following
- Sender’s email address(e.g. noreply@example.com)
- Incoming mail server (SMTP)
- Outgoing mail server (SMTP) authentication (username & password)
- Outgoing mail server port (usually ‘25’)
- Click the Save button
Create a New Order
Release an Order
Edit an Active Order
Reverse a Done Order
Batch Release and Reprint
Dues invoicing (Backorders)
SOP Error Log
Returns System
Add New, Edit Title Records
Receive Stock (Goods-In) to a Location
Send Out Consignments or Transfer Stock
Process Sales Orders
Do Stocktake
Process Printer/Supplier Invoice
Calculate unit costs
Post Stock Value to Cost of Sales
Add, Classify Edit Accounts
Post Journals
Cash Book
Transfer Money
Post Budgets
Setup Control Accounts
Cost of Sales Overview
Post costs from Purchases
Post Direct Job Transactions
Calculate unit costs
Job Profile / Enquiry
Calculate Royalty
Print, Email Royalty Statements
Post Royalty Payments
Withholding Tax on Royalty
Add Author Records
Set Royalty Rates
Set Rights Royalty