

Editorial & Production
The Editorial and Production module enables you to manage a Project through a customisable workflow, cost estimating, purchase orders, print instructions, specifications, publication date changes, bibliographic data (for ONIX purposes), images and digital assets.
The Editorial and Production module enables you to
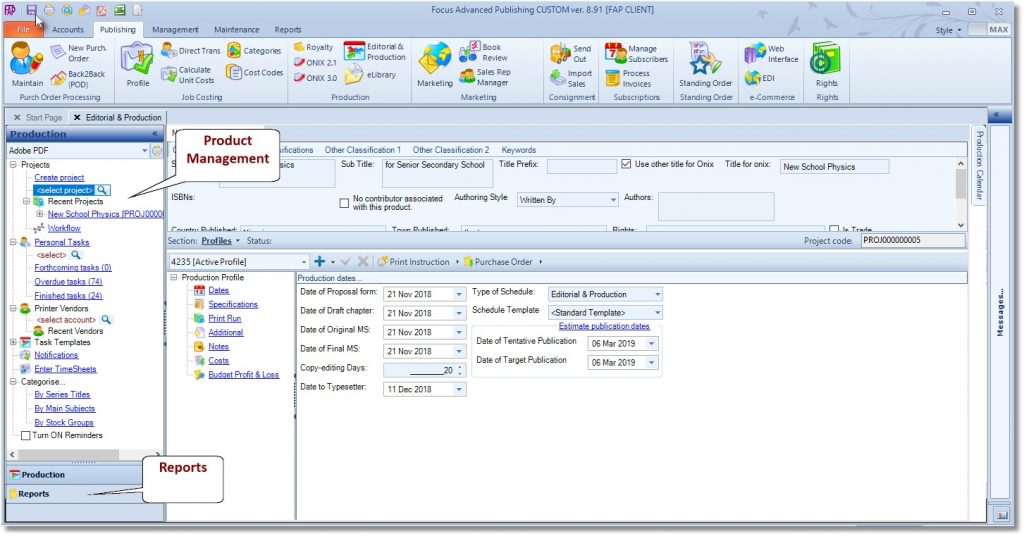
A Project is a family of products, i.e a book title and its product forms. It contains a user-definable and workflow-driven progress tracking from proposal to product; each workflow node is capable of emailing unlimited alerts, mail-merged documents, screen/emailed notifications, auto-assigning of ISBN and auto-creation of product forms (such as eBook, Hardback).
FAP introduces the Concept of Project (Header/family) and Products (children) relationship to address the emergence of e-products and their relative importance against traditional forms such as paperback and hardback, which have meant that modern publishing no longer assume the paperback or hardback to be the primary product forms.
FAP now better reflects this trend in the industry; hence the general processing is now anchored in the concept of the Project. FAP allows you to work at the level of a Project and then create product forms form there on.
Unlike in the FOP where the book starts life as a paperback or hardback, the trend in modern publishing tends to treat these as merely possible product forms with same importance as eBooks and other formats. This means that if the book will be published in more than one product form, e.g. eBook as well as paperback, both product forms are held together under same Project code, and will subsequently share common data such as title, author, subtitle, cover image etc.
The module organises the products under an umbrella project name, this ensures that when updating is done at the project level, the system will copy down the fields where the project and products should share identical values.
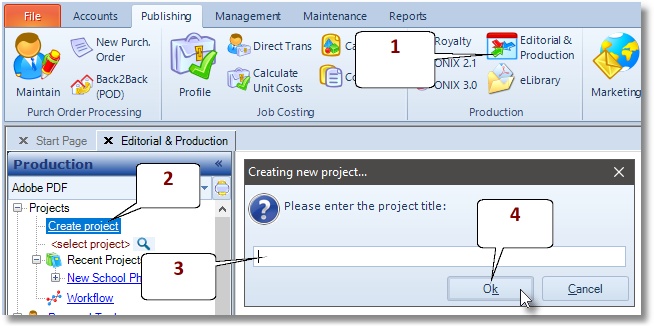
How to Add a new Project
- Go to Publishing > Editorial & Production.
- Click on the Create Project option as indicated.
- Enter the name of the project in the space provided.
- Click OK to finish.
- The system will reject a name that is already saved in the system.
- To successfully create a new project the system must be set to auto-generate new code for stock records.
How to Find and Edit an existing Project
- Go to Publishing > Editorial & Production
- Click on the magnifying glass as indicated, or find and click the required project under the heading Recent Projects, as shown below.
- Enter a search text into the space provided. You do not need to enter a full title into the search, a unique part-title will do.
- Finally, press the ReturnKey on your keyboard or click on the OK button, as indicated below.
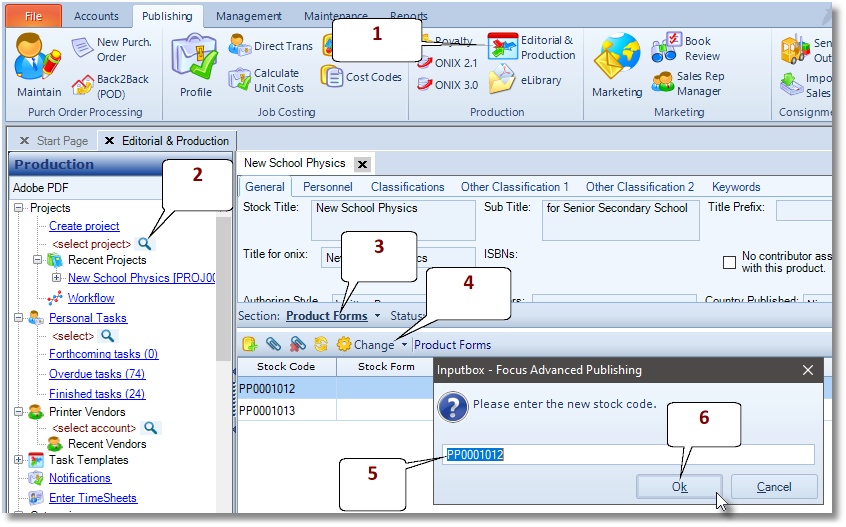
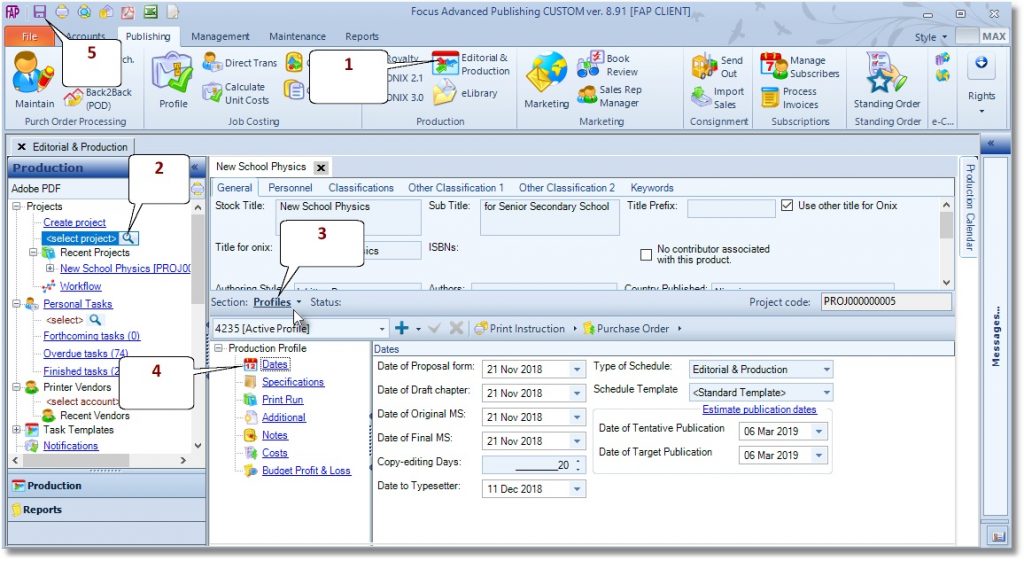
How to continue editing on the Product Window
- Go to Publishing > Editorial & Production
- Click on the magnifying glass as indicated
- Enter a search text into the space provided. You do not need to enter a full title into the search, a unique part-title will do.
- Press the ReturnKey on your keyboard or click on the OK button, as indicated above.
- Expand the stock record by clicking the (+) sign beside the name.
- Click Product Forms Section
- Double-click on a product form to go to the Product window.
- To access the Editorial & Production and theProduct windows side-by-side, right-click the Product Window tab and select New Vertical Tab Group
How to Edit Specifications
- Click on the magnifying glass, or find and click the required project under the heading “Recent Projects”, as shown below.
- Next, click on the plus (+) sign to the left of the project name, to open the sub sections for the project.
- Next, click on the “Profile section” option.
- Next, click on Specifications, as shown below.
- Click on Savebutton to finish.
How to Add Print Run
- Click on the magnifying glass, or find and click the required project under the heading “Recent Projects”, as shown below.
- Next, click on the plus (+) sign to the left of the project name, to open the sub sections for the project.
- Next, click on the “Profile section” option.
- Next, click on Print Run, as shown below.
- Click on Savebutton to finish.
How to Add Costs
- Click on the magnifying glass, or find and click the required project under the heading Recent Projects, as shown below.
- Next, click on the plus (+) sign to the left of the project name, to open the sub sections for the project.
- Next, click on the Profile section
- Next, click on Costs, as shown below, to add the costs per cost code and category.
- Click on Savebutton to finish.
How to Add Selling Price to the Project
Prices are added to the product level.
- Click on the magnifying glass, or find and click the required project under the heading “Recent Projects”, as shown below.
- Next, click on the plus (+) sign to the left of the project name, to open the sub sections for the project.
- Next, click on the “Product Form section” option.
- Next, double-click on a Product Form in the list shown on the right, to go to the Product window.
- Next, enter the Selling price into the field called Price 1, as shown below.
- Click on Savebutton to finish.
Get Budgeted Profit and Loss
- Click on the magnifying glass, or find and click the required project under the heading “Recent Projects”, as shown below.
- Next, click on the plus (+) sign to the left of the project name, to open the sub sections for the project.
- Next, click on the “Profile section” option.
- Next, click on Budgeted Profit & Loss, as shown below.
- Click on export to “Excel” button to finish.
How to Track Progress
- Click on the magnifying glass, or find and click the required project under the heading “Recent Projects”, as shown below.
- Next, click on the plus (+) sign to the left of the project name, to open the sub sections for the project.
- Next, click on the “Progress Tracking section” option.
- Tick to complete a task
Auto-generate new code for stock records
- Go to Maintenance> Preferences
- Select Code Formats
- Under Stock Ledgerselect System-Generated
- Click the Savebutton
Configure the Progress Tracking Workflow
Your dealer should help setup an initial Progress Tracking workflow during the installation exercise, where the tasks will be configured to trigger embedded actions, such as emailing specified personal at the appropriate stage/task.
- Go to Publishing> Editorial & Production
- Click on Workflow and indicated below, to configure the Progress Tracking Workflow as required
- Click Save to finish
Create a New Order
Release an Order
Edit an Active Order
Reverse a Done Order
Batch Release and Reprint
Dues invoicing (Backorders)
SOP Error Log
Returns System
Add New, Edit Title Records
Receive Stock (Goods-In) to a Location
Send Out Consignments or Transfer Stock
Process Sales Orders
Do Stocktake
Process Printer/Supplier Invoice
Calculate unit costs
Post Stock Value to Cost of Sales
Add, Classify Edit Accounts
Post Journals
Cash Book
Transfer Money
Post Budgets
Setup Control Accounts
Cost of Sales Overview
Post costs from Purchases
Post Direct Job Transactions
Calculate unit costs
Job Profile / Enquiry
Calculate Royalty
Print, Email Royalty Statements
Post Royalty Payments
Withholding Tax on Royalty
Add Author Records
Set Royalty Rates
Set Rights Royalty